Showing posts with label to. Show all posts
Showing posts with label to. Show all posts
Sunday, August 28, 2016
dcpromo demote Win2k3 server Failed to configure the service NETLOGON as requested
dcpromo demote Win2k3 server Failed to configure the service NETLOGON as requested
Heres the full text of the error received:
the operation failed because:
Failed to configure the service NETLOGON as requested.
"The wait operation timed out"
and in the dcpromo.log is the following:
07/07 09:02:24 [INFO] Informed NETLOGON to deregister records
07/07 09:02:24 [INFO] Stopping service NETLOGON
07/07 09:04:24 [INFO] StopService on NETLOGON failed with 258
To fix:
Change the first DNS setting on your network card to point to your new DNS server, not the server you are currently demoting. Once you change the DNS setting to the new DNS server you will be able to demote the server without this issue.

Chrome to Phone replacement for FoxtoPhone users Sendroid
Chrome to Phone replacement for FoxtoPhone users Sendroid
I was very annoyed this week to discover that Google has depreciated their useful little "Chrome to Phone" extension. This was a simple tool to send links from your desktop browser to your Android phone with one click. I personally prefer Firefox over Chrome, but there was no problem thanks to the useful FoxtoPhone add-on for Firefox that sent links from Firefox to your phone through the Chrome-to-Phone app.
 DEPRECIATED
So I was annoyed to see a huge "[DEPRECIATED]" notice in the title of the "Chrome to Phone" Android app. It now runs this message in both the Android apps Play Store page and the corresponding Chrome extensions page.
NOTICE: Chrome to Phone is no longer supported
Chrome to Phone was launched in 2010 to help bridge your desktop and phone experience by making it easy to send Web links to your phone. Over the years, Google’s core products have evolved to be more integrated across different form factors. As of today, Chrome to Phone is deprecated. The app will continue to work until Mar 31st 2016 after which it will no longer work.
Based on the comments section for the Chrome extension, Im not the only annoyed person out there. Google is really becoming the new Apple. I abandoned Apple precisely for its tight-fisted walled-garden approach. Anyway, their recommendation for replacement (Chrome tab sync) are utterly useless for me, a Firefox user (though lets be honest, anything that steals even more marketshare is music to their ears). Firefox also has a tab-sync feature; the trouble is I prefer Firefox on desktop and Chrome on Android. Until now, the Chrome-to-Phone/FoxtoPhone combo meant they both played nice.
Sendroid
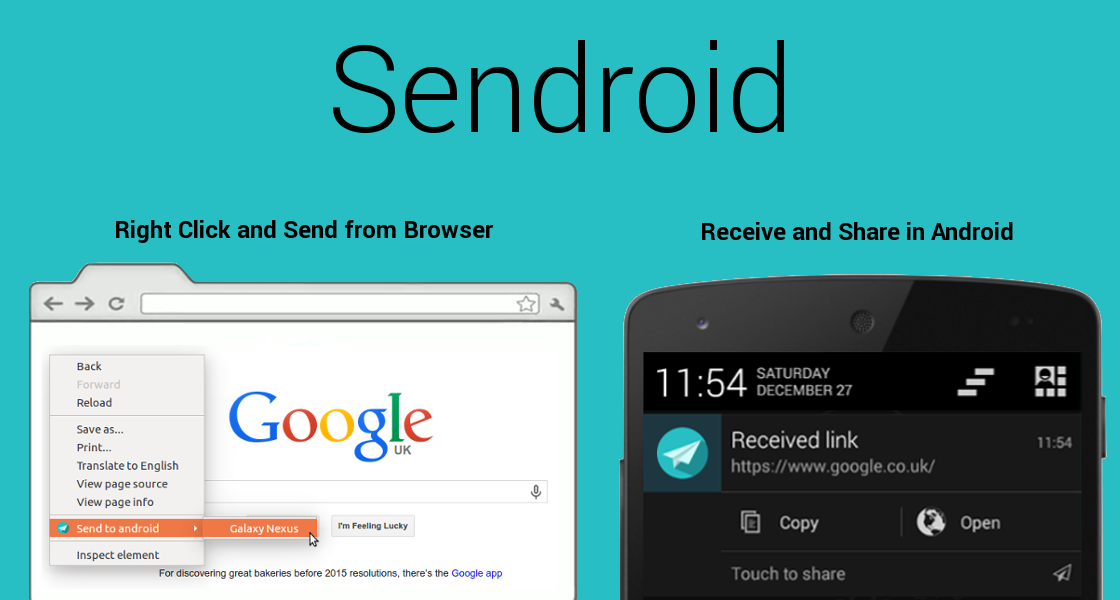
But hope is not all lost. In my search for a replacement, I came across a little Firefox Add-on called Sendroid that does basically the same thing, with a partner light-weight Android app. Ive been trying it out, and heres a review of what I think:
PRO:
- Image auto-download. This is a cool feature Chrome2Phone was missing. Right-clicking images in Firefox now allows me to send that image, not just the link, to my Android (well, the link gets sent, but then automatically downloaded on my phone).
- Android share menu. I would always receive links via Chrome2Phone on Android, but not necessary want to launch them (I mean obviously I was on that page seconds before on desktop). If I sent a link to my phone, its usually because I intended to send it, either to Keep or to a KakaoTalk chat-room. Sendroid automatically gives me that ability without having to swipe away the notification and open the app (as I had to do with Chrome2Phone)
- No log-in. Obviously FoxtoPhone needed access to my Google account to send via the Chrome2Phone protocol. Sendroid just uses a unique registration code your phone generates when first installing. Just copy the code to the Firefox extension once, and youre set.
- Multiple receivers. This is a biggie. I usually used Fox2Phone to send links to my Android, which Id then send to a friend on Kakao. Sendroid cuts out the middle-man: if he/she also has the light Sendroid app, I can send it right to them directly.
CON:
- No history. Chrome2Phone would save a list of all the links/text it had received. Good for links I sent, swiped away, then wanted to consult later. Sendroid has no such history.
No link launching. This is a bit annoying. Sometimes when I send a link, I do want to launch it in the Android browser. There seems no option for this: you share the link to an installed app. Thats it. And neither mobile Chrome nor the stock browser are in the Android share menu.
EDIT: I was mistaken. When the notification shade is filled with lots of other items, the Sendroid notification contracts to a smaller size, like do many other notifications, which allows only for a single tap, which opens the Share menu. However if your notification shade is basically empty, it will expand to allow either sharing, copying the link, or launching the link. Here are the two states of the notification you receive:

For now until that March 31st deadline, Ill continue to use Fox2Phone alongside Sendroid. Who knows, maybe the FoxtoPhone developer will come-up with a workaround. I do find it a bit weird that Sendoid has so few users (12 reviews on Google Play, 100~500 installs, 37 users on Chrome, 62 users on Firefox as of today) but I will chalk it up to "Chrome to Phone" having been an official Google-branded product. I wouldnt have even thought of trying Sendroid either, until now anyway.
I do wonder how much longer the Blogger service will up and running. Every time I log-in to this blog, I hold my breath in fear of a giant "DEPRECIATED" across the screen. Google, I want to love you, I want to use your services, but you make it hard to love you. Dont send me into the arms of Wordpress
? Sendroid Firefox Add-on
? Sendroid extension at Chrome Web Store
? Sendroid Android app on Google Play
Android BluetoothChat connect to Arduino Uno HC 05
Android BluetoothChat connect to Arduino Uno HC 05
Last example show "Android BluetoothChat example link with HC-05 Bluetooth", to connect to PC via FTDI adapter. Here is another example - Arduino UNO + HC-05 to echo received data back to the sender.
For my on-hand HC-05 sample, it set as slave role and 9600, 0, 0, PIN="1234" by default. So it can be used in this example without any extra setting.

Connection between UNO and HC-05
HC-05 Rx - Uno Tx (1)
HC-05 Tx - Uno Rx (0)
HC-05 GND - Uno GND
HC-05 VCC - Uno 5V
(My HC-05 marked "Power: 3.6V-6V", refer here, make sure your HC-05 can work on 5V.)
Uno_Serial_echo.ino
/*
Arduino Uno + HC-05 (Bluetooth) - echo bluetooth data

Serial (Tx/Rx) communicate to HC-05
HC-05 Rx - Uno Tx (1)
HC-05 Tx - Uno Rx (0)
HC-05 GND - Uno GND
HC-05 VCC - Uno 5V

*/

void setup()
{
 delay(1000);
 Serial.begin(9600);
}

void loop()
{
 while(Serial.available())
 {
 char data = Serial.read();
 Serial.write(data);
 }
}
This video show how Android BluetoothChat example link with Arduino UNO + HC-05. For the Android BluetoothChat example, refer last post.
Related:
- Connect Arduino Due with HC-06 (Bluetooth Module)
Friday, August 26, 2016
Export Blogger archive to Google Calendar or iCal
Export Blogger archive to Google Calendar or iCal
Here is a way to export a Blogger archive file to your Google Calendar, or any iCal-based calendar program.

Background: Blogger .xml archive -> iCal .ics file
Basically, I was looking for a way to recreate the sort of "Timehop" feature where what you were doing on social media "On this Day..." would resurface on that day years later. You know, like with Facebooks "On this Day" feature or Google Photos "Rediscover this Day". But I couldnt find any such thing for a Blogger blog, and you might have years of old embarrassing posts that youd love to relive. Why leave them just sitting unread? Relive them each day by having those old posts appear (either as links or full entries) in your calendar.
So I haphazardly found a way to import those posts into Calendar, so that I can set them as recurring events. Now Im no programmer or app author. Basically, I just manually edited my Blogger archive file with a bunch of Find/Replace commands, until it met the standards of an iCal file for importing to Google Calendar. In other words, I manually transformed the file from one type to another. Its a totally do-it-yourself way.
Now like I said, Im no expert and I am 100% sure there are better ways to do this, and someone much smarter than me could probably write a self-contained program or macro to do this automatically. But Ive never found a program like that to convert Blogger archive .xml files to .iCal files. So I had to make do with my own limited knowledge.
But Im hoping that following these copy/paste instructions can save you the hassle of figuring out the code manually, and can help semi-automate this process so that you can convert over the file quickly and hopefully painlessly. Just copy/paste these strings into the Find/Replace box and in about 5~10 minutes you should be ready to go.
Tool: Notepad++
The only tool you will need is a text editor program called Notepad++.
I chose this because its free, open-source, and works great with regular expressions. I used version 6.8.8.
 |
| Find/Replace dialog box in Notepad++ |
This is the Find/Replace dialog box in Notepad++. We are going to basically use this and only this. A lot. So get comfortable with it.
And before we start double-check that "Regular expressions" is selected and ".matches newline" is checked.
The iCal format
So a basic iCal file follows this format. I need to make my blog archive file look like this. This will be the template style that were aiming for.
BEGIN:VCALENDAR
PRODID:<Test>
VERSION:2.0
BEGIN:VEVENT
DTSTART;VALUE=DATE:20160130
RRULE:FREQ=YEARLY
DESCRIPTION:here is some entry content. Looking good my man.
SUMMARY:here is the event title aka blog post title
END:VEVENT
END:VCALENDAR
As far as I could tell, Google will only successfully import the file if you have these items as a minimum. OK, lets start.
Open the Blogger archive .xml file in Notepad++.
Part 1 - Preliminary file clean-up
Step 1.1 - Beautify (Optional)
You dont have to do this, but I recommend it. The big block of code on your screen is ugly, confusing, and unorganized, and its difficult to see where items start and stop. So I suggest installing the "XML Tools" plugin via Notepad++s Plugin Manager.
Once its installed, find it in the plugins menu and choose the menu option "Pretty Print - XML only". Now the code looks organized and clear.
Step 1.2 - Clear the junk out
OK, now lets start the editing. Remember, for everything we do, ensure in the Find/Replace box that "Regular expressions" and the ".matches new line" boxes are checked.
[We just want your entry data, but the Blogger archive file includes lots of information about your settings, template, etc. It seems to store this data as unused blog "entries." Since we dont need that data and only want the post content, lets remove it all.]
Use the "Find..." command to find this in the file:
BLOG_USE_LIGHTBOX
Youll probably get back three results, but all are in the same blog entry (i.e. between a pair of <entry> and </entry> tags). Which ever entry includes this BLOG_USE_LIGHTBOX code will be the final of the useless unused blog entires, meaning your real, first, actual blog post starts after this entry.
So with your eyes, look down a few lines from the last BLOG_USE_LIGHTBOX and find the first <entry> tag just below. Overall, for my test archive file, this was around line 3460.There are lots of <entry> tags so make sure youve got the right one.
Now delete EVERYTHING above that <entry> tag.
Youll be left with just actual blog posts.
Step 1.3 - Delete useless blog post info
Now we start using Find/Replace to remove the bits that are useless to us. So use the Find/Replace function to Find each of these items (yes, one at a time because Im not a programmer) and Replace them with nothing (leave the Replace box blank).
These functions will find these tags and all the content between them, and remove it. Just paste each of these one at a time into the "Find" box, make sure the "Replace" box is empty, and hit the "Replace All" button. Repeat for each:
- <id.*?</id>
- <author.*?</author>
- <updated.*?/>
- <media.*?/>
- <category.*?/>
- </title>
- <link rel=edit.*?/>
- <link rel=self.*?/>
- <link rel=replies.*?/>
- <thr.*?/thr:total>
- <thr:in-reply-to.*?/>
- <gd:extendedProperty.*?/>
Note: depending on your blog some of these items might not be found anyway. No problem.
Part 2 - Start replacing the tags
Step 2.1 - Location data
You should decide if you want your blog posts geotag/location data kept and used as the location for the calendar events.
Step 2.1 A - Preserve it!
If you want this preserved, do this:
Find:
<georss:featurename>
and Replace it with:
LOCATION:
and
Find:
</georss:featurename>.*?</georss:box>
and Replace it with nothing (i.e. leave the box blank)
Step 2.1 B - Remove it
If you do not want locations included, or if you never geotaggeg your blog posts, then you can remove all location info with this:
Find:
<georss:featurename>.*?</georss:box>
and Replace it with nothing
Step 2.2 - Replace Blogger tags with iCal-friendly tags
Now its time to do some replacement. Just Find/Replace these sets:
Find:
<published>
and Replace it with:
DTSTART;VALUE=DATE:
This will set the blog post in the calendar to the date of the blog post. I opted to ensure the set blog post is used (whether you published it then or had manually back/forward dated it) instead of the date the entry was last updated.
Find:
<entry>
and Replace with:
BEGIN:VEVENT
and
Find:
</entry>
and Replace with:
END:VEVENT
These will make each blog post its own event.
Find:
</feed>
and Replace with:
END:VCALENDAR
This will mark the end of the blog archive as the end of your imported calendar data.
Step 2.3 - Blog post title as event title
Find:
<title type=text>
and Replace with:
SUMMARY:
That will set the blog posts title as the event title. So what you see as the entry on your calendar will be this. You dont have to do this, of course. Were starting to get into the "what you feel like" part.
Optionally, you could add some sort of prefix here if you wanted. For example, instead of Replace with just SUMMARY you could use SUMMARY: Blog Post- so your calendar entry can be more visually distinguished from other normal calendar events.
Part 3 - Calendar entry content
Step 3.1 - Choose the entry content: Link or post?
Now we need to decide whats going to go in the event description.
- Do you want the entire posts content in there, so that you can read the whole post in your calendar?
- Or do you want just a link to your original blog post?
Step 3.1 A - Blog content as Description
If you want the entirety of each posts content copied to each corresponding calendar entry, do this:
Find:
<content type=html>
and Replace with:
DESCRIPTION:
Then Find the following items, Replacing each with nothing (i.e. leave the box blank):
- </content>
- <link rel=alternate type=text/html href=
- title=.*?/>
This will leave a link to the original post at the end of the entry. If your post was a draft in Blogger, it wont have a link because it was never published.
Step 3.1 B - A link back to original post as Description
If you just want a link back to the original post in your calendar event:
Find:
<link rel=alternate type=text/html href=
and Replace with:
DESCRIPTION:
Then Find the following items, Replacing each with nothing (i.e. leave the box blank):
- title=.*?/>
- <content type=.*?</content>
Part 4 - Clean Up
Now we need to clean up the number formats to make the Blogger timestamps fit well with a Calendar app.
One problem is that your blog archive file has whatever time zone setting your blog had. So the publish times are going to be off. But I dont really care about accurate hours, just accurate dates. So Im going to make my life more simple and just remove the timestamps.
Optional: You could edit this to keep the timestamps and, for example, just change the time zone marker to "Z" so it thinks the posting time was in GMT. Thats easiest. Then youd have to remove the colons separating the hour:minute:seconds. And go back and remove ";VALUE=DATE"
But I just want the dates (this will make the blog post an "all day" event on your calendar).
So lets remove the time-stamps and clean up the date-stamps. But before that, decide:
Step 4.1 - Repeat or Not?
Decide if you just want your blog posts exported to the calendar, on just the dates when they were posted, or if you want them to repeat annually. I like that whole "time hop" on "On this Day" feeling, so I perfer to have them repeat annually.
Step 4.1 A - No repeat
For no repeat, and just a proper archive, then run this Find/Replace task:
Find:
T(d+):.*?</published>
and Replace with nothing (i.e. leave the box blank)
Step 4.1 B - Repeat annually
But if, like me, you like the whole "time hop" reminder, and would like to see each post repeat on its same day each year, run this task instead. I highly recommend this, as its a great way to revisit your content.
Find:
T(d+):.*?</published>
and Replace with:
RRULE_FREQ=YEARLY
and
Find:
(d+)-(d+)-(d+)
and Replace it with:
$1$2$3
This will remove the hyphens from the date format Blogger uses. We need just a pure series of numbers. Hat tip to http://stackoverflow.com/a/25627871
Step 4.2 - Header
Congrats, were almost done. Now just manually go add this to the very top of the page:
BEGIN:VCALENDARPRODID:<Test>VERSION:2.0
Finally, its time to clean out any messy tab spaces that are left over. Its important that each item be at the start of a new line. There can be extra blank lines between, but everything needs to be far-left as possible. So lets remove any errant tab spaces:
Find:
+
and Replace with nothing (i.e. leave the box blank)
Step 4.3 - Save
Now just save the file as plain text ("Normal Text File" in the drop-down menu in the Save dialog box).
Before saving, rename the extension from .txt to .ics
Step 4.4 - Import file
You can now import the file into your Google Calendar or whatever calendar app.
Final Thoughts
Play around with this and find the best method that works for you. For example you might want to better format the post content if you chose to show the whole original post inside the calendar. Links in your original blog post will stay in the calendar event description (if you chose to keep the full content) but images of course wont display (links to the images will be there though).
Just have fun and I hope you found this helpful. Im no programmer, but just spent a few hours playing around with this. Its a good way to resurface old memories, and gives another back-up option besides just your hosted blog, or a dead archive file sitting on your hard drive.
Good luck and enjoy revisiting all those old blog memories.
Tuesday, August 23, 2016
1974 Turing Award to Donald Knuth
1974 Turing Award to Donald Knuth
In 1974 the Alan Touring Award was given to Donald Knuth for "a number of major
contributions to the analysis of algorithms and the design of programming languages".
I recently found on the net the original ACM Article.
Obviously Knuth is a real genius and his article is still off interest even after 33 years.
Sunday, August 21, 2016
Arduino Meets Linux The Users Guide to Arduino Yún Development
Arduino Meets Linux The Users Guide to Arduino Yún Development


The Yún is one of the most powerful and flexible hardware development boards in the Arduino range. It combines the ease-of-use of the Arduino platform, with the power of a 400 MHz Atheros AR9331 Wi-Fi system-on-chip (WiSOC) that runs Linux.
But if you are not experienced and confident in working with Linux-based operating systems, it may be difficult for you to use the Yún to its full potential.
Bob Hammell is the author of popular Arduino learning resources, such as Connecting Arduino: Programming and Networking with the Ethernet Shield. In this book, he guides you through all of the Arduino Yún’s features and explains how to make use of this unique board.
Using interesting and fun examples, in Arduino Meets Linux: The User’s Guide to Arduino Yún Development you can learn how to:
- Connect your Arduino Yún to your network, using built-in support for Wi-Fi and Ethernet;
- Work with OpenWrt-Yun Linux through the command line;
- Use the Bridge Library to communicate and share data between both of the Yúns chips;
- Write Python and shell scripts to automate tasks and use the power of the AR9331 in your Arduino projects;
- Work with Temboo and third-party APIs to access popular web services;
- Host your own websites and application programming interfaces (APIs) on the Yún;
- Use USB devices, such as audio interfaces and gamepads from Microsoft Xbox 360® and Sony PlayStation® games consoles;
- Build Arduino projects that act as a keyboard or mouse when you plug your Yún into a PC or Mac;
- Add voice recognition and speech to your Arduino projects;
- Download source code, view demo videos, and access extra projects from the books companion website, ArduinoMeetsLinux.com;
- And much, much more.
With the Arduino Yún, you can take your Arduino projects to the next level. This book shows you how.
Thursday, August 18, 2016
Establish Point to Point Connection
Establish Point to Point Connection
Apply Model: N2, N2C, N5, N5C, and AP121U
Hardware Setup – 
Setup Procedure -
Setup your FIRST UNIT as a WDS Access Point
AP Bridge Mode, WDS Access Point Mode, IP address 192.168.2.1
*************************************************************
AP Bridge Mode, WDS Client Mode, IP address 192.168.3.1

Setup Procedure -
Setup your FIRST UNIT as a WDS Access Point
AP Bridge Mode, WDS Access Point Mode, IP address 192.168.2.1
Open your browser and enter configuration IP address http://192.168.2.1
Enter admin/admin for user name and password.
Now, it shows the status of your unit
Click on Advanced and select Operation Mode
Choose the AP Bridge from the drop down menu and press Apply button when finished. 
Your unit will reboot and save your current settings. 
After rebooting, your browser will show you the status of your unit in AP Bridge Mode as shown below. 
Make sure your DHCP server is disabled.
Select Advanced >> Network Setting >> LAN

Enable WDS Access Point mode for your first unit.
Select the Advanced >> Wireless Settings >> Basic use drop down menu to select WDS Access Point from Wireless Mode and press Apply button when finished.

*************************************************************
Setup your SECOND UNIT as a WDS CLIENT
AP Bridge Mode, WDS Client Mode, IP address 192.168.3.1
Open your browser and enter configuration IP address http://192.168.2.1 and enter admin/admin for both user name & password when prompted. 
Status page showing your 2nd unit in AP Router mode (default setting) 
Select Advanced >> Operation Mode
Choose AP Bridge from the drop down menu and click Apply when finished. 
Your unit will reboot and save your current settings.
After rebooting, your browser will show you the status of your unit in AP Bridge Mode as shown below. 
Now, we need to change IP address for the unit to 192.168.3.1 and make sure DHCP is disabled.
Select Advanced >> Network Settings >> LAN and change the IP address from 192.168.2.1 to 192.168.3.1. Lastly, press Apply button when finished. 

Open your browser and enter configuration IP address http://192.168.3.1 and enter admin/admin for both user name & password when prompted.
Your browser will show you the status of your unit in AP Bridge Mode as shown below.
Enable WDS Client mode for your second unit.
Select the Advanced >> Wireless Settings >> Basic use drop down menu to select WDS Client from Wireless Mode and press Apply button when finished.
Press Scan button to find your target SSID that you setup for your 1st unit. 
Select your target SSID from the list and press Apply when finished. 
**************************************************************************************
Verification -
My PC is connected to 2nd Atheros unit so able to ping both 1st and 2nd Atheros unit 
Another PC is connecting to 1st Atheros unit and received IP address from the Router and able to ping Google and open www.yahoo.com web page
